Saturday, October 22, 2011

One Sketch, Two Cards

Hi there! It's time for my take on the Freshly Made Sketches #7 Challenge. First of all, I loved this sketch! I don't know what it was but I was really drawn to it this week. So much so that I ended up making two cards with it!

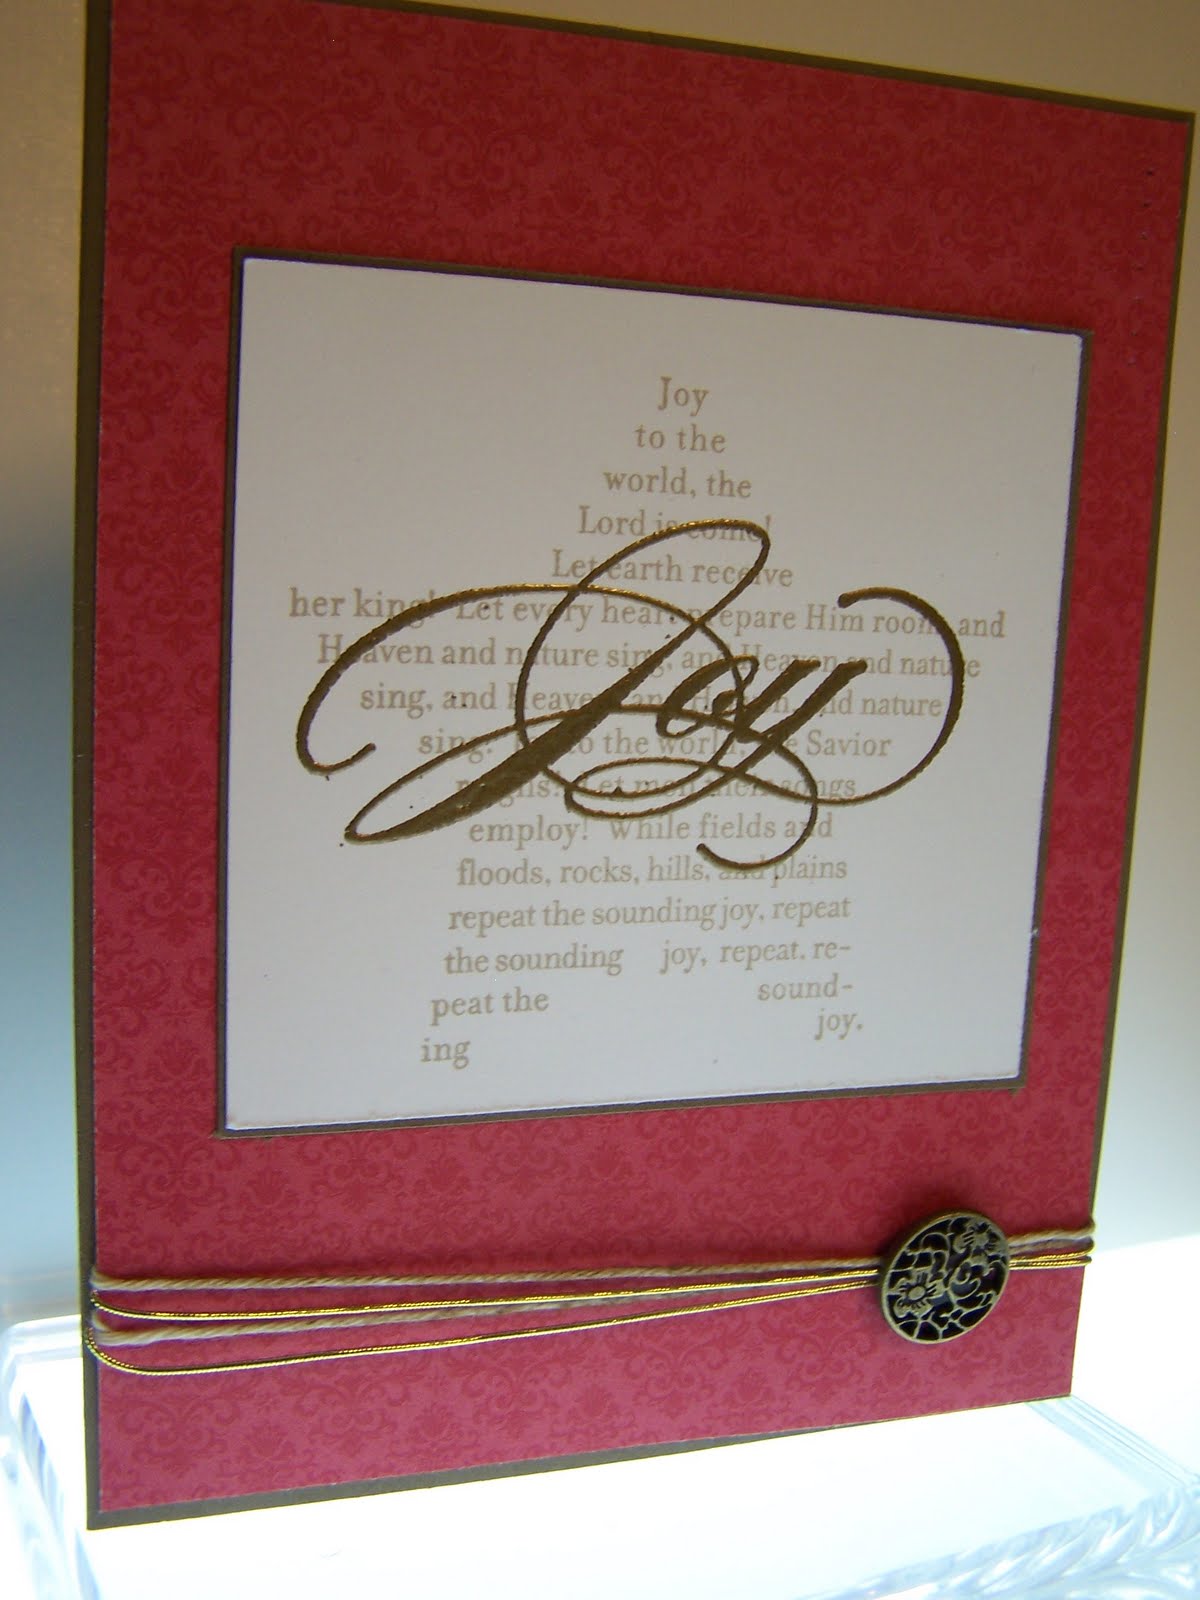
The first was a Christmas card. For this card I used a crumb cake base, layered with early espresso. Hmm..... that sounds like tiramisu! The retired Christmas Cocoa DSP made another appearance. I just love the shimmer in this paper and the white snowflakes. I stamped Dasher in Versamark and embossed him in gold. After I got done, the card seemed to be missing * something *. So I added the rhinestones on the snowflakes and I think that was it. Was it?

While I was making the Christmas card, I got a text from my daughter that she got an interview to go on Alternative Spring Break this year. She is so excited! So I had to make her a card to share in her enthusiasm.

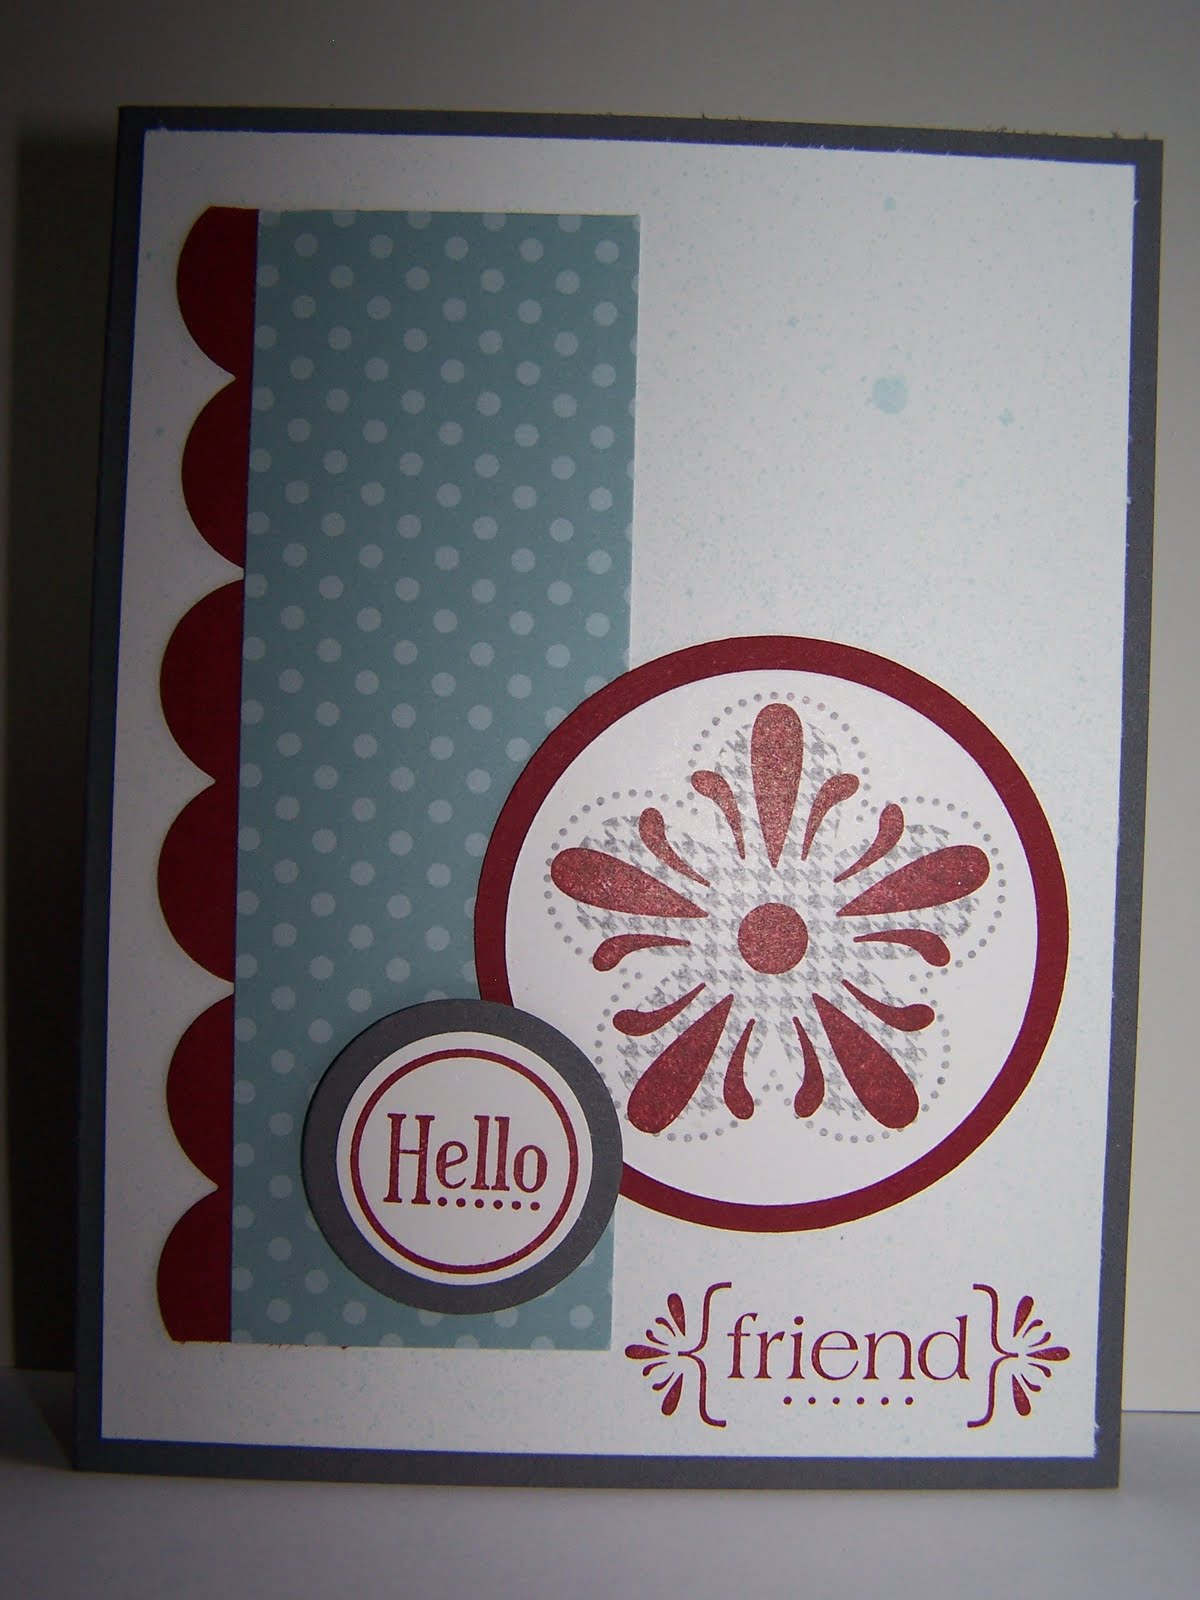
For this card I started with a Lucky Limeade base and added a whisper white layer that I stamped with the distressed dots background stamp. I then layered on a piece of Cheerful Treat DSP and Melon Mambo cardstock. The flowers were made with the boho blossoms punch and some brights brads.

Two VERY different cards out of the same sketch! I love when that happens! Thanks to the Freshly Made Sketches team for such great inspiration.


The Sounding Joy

Hi there! Can you believe that it's time to start crafting Christmas cards? Actually, it's way past time if you have a ton to do. I usually only send out about 50 so that's still doable. I've been fiddling around with different Christmas sets to find what I want to do this year. But who am I kidding? I end up making about 5 of the same card and then getting bored and have to come up with something new anyway. I end up using all my prototype cards to actually send out so it's not too bad!

This card was made with a Soft Suede base. I then layered on a piece of DSP from the Christmas Cocoa pack from two years ago. I know, I know! But I'm trying not to hoard. I loved that paper but I need to use it up. You should always use what you have and love and not feel bad about it just because "that paper is so two years ago!". Unless it's paper from the 90s. Then you have permission to feel bad. Some of that paper was truly horrid.

Anyway. . . I inked up the star stamp from The Sounding Joy with Crumb Cake ink and stamped it onto Whisper White cardstock. Then I stamped the joy image from the same set in Versamark ink and embossed it with gold embossing powder. The panel was matted onto another piece of Soft Suede. At the bottom, I added two pieces of baker's twine that I had sponged with soft suede ink and two pieces of gold cord. Over the top of those, I added a brad from the Antique brads collection.

Let me know if you have any questions!

Stamps: The Sounding Joy
Card stock: Soft Suede, Whisper White
DSP: Christmas Cocoa (retired)
Ink: Crumb Cake, Versamark
Other: Baker's twine, gold cord (retired), antique brad, embossing powder

What I Did When I Wasn't Stamping

Hi there!

So this blog is called Janey Rocket Creates, right? It doesn't really specify that I only create cards, right? So I'm just going to take this opportunity to post something else that I created last weekend! My daughter came home from college for a weekend visit and she enlisted my help in finding her the perfect Halloween Costume for her. She is going to be Rosie the Riveter. Do you know Rosie?


Amy is a strong woman herself so this is the perfect costume for her! We were able to find a denim dress at the second-hand store that fit her like a glove. But it was a dress, not a shirt. Mom to the rescue! I cut it off and hemmed it up. Then I made a name badge to make it look more uniform-y with the name "Rosie" stitched on it. We dug around in an old box and came up with a Girl Scout badge that never made it onto her vest (whoops!) and I sewed that on to the collar. Bam! A Rosie the Riveter costume was born. Okay, well she still needs to add the pants, and the headscarf, but she's got the muscles and the attitude to pull it off! I'll be sure to add pictures of her once she emails them to me.


I'll be back a little later with another card today. It's time to start working on Christmas cards over here.

Have a question? Leave me a comment and I'll get back to you!

Housewarming Card for Judy

Hi there! Today's card is one I made for my sister-in-law for her housewarming party. It is a CASE from a card by CBMott at Splitcoast Stampers. I put a few of my own twists on it of course.


The most difficult part for me was trying to get the right size for the siding strips. But after a couple of tries I settled on strips that were about 1 3/8" wide. The door was created with Cherry Cobbler paper that I also sponged in the same color ink. I like the depth that sponging just the edges gives. The planters were made with the oval punch cut in half with the ends snipped off. The door knocker was made with a piece out of the Antique Hodgepodge Hardware set.

If you have any questions about what was used for what, just leave me a note!

Stamps: Short and Sweet (retired), Numbers (not SU, unknown manufacturer)
Cardstock: Cherry Cobbler, Crumb Cake, Basic Gray, Pumpkin Pie, Old Olive, Daffodil Delight, Whisper White
Ink: Basic Black, Cherry Cobbler
Punches: Large Oval, Blossom Trio (retired), Bird Builder
Other: Hodgepodge Hardware, Black brad (non-SU)


Monday, October 10, 2011

Hello, Friend!

Good morning! Today I have another card that combines two challenges. The first is Freshly Made Sketches #5. I really love the sketches their design team comes up with. So easy to take inspiration from and as it turns out, there are a ton of talented people who link up each week. I have found so many new blogs to read there. Anyway, on to the card.


I also used the second half of our Chopped Challenge this week, in which our mystery ingredients were color mist, and the XL fancy flower punch. I made my own color mist by placing 7 or 8 drops of refill ink into a tiny spritzer bottle of water. I have tried it with both water and rubbing alcohol and get different results. For this cleaner card, the water worked better. And can you spy the XL Fancy Flower punch? The scallop along the left side are petals from that punch cut off in twos and lined up underneath my designer series paper. I LOVE punches that can do double duty!

Thanks for stopping by and please let me know if you have any questions!

Stamps: With All My Heart, Posy Punch
Card Stock: Basic Gray, Whisper White, Cherry Cobbler
DSP: Subtles DSP Paper stack
Ink: Basic gray, Cherry Cobbler, Baja breeze refill
Punches: XL Fancy Flower, 1" circle, 1 1/4" circle
Other: Non-SU circle cutter (but should have used my circles die! Shoot!)

Sunday, October 9, 2011

Chopped Challenge #5

Okay, so this card was supposed to be for two challenges. The first being the Sweet Sunday Sketch #138 and the second being our Chopped Challenge #5. Well, let's just say that the diagonal paper element of the SSS challenge really threw me for a loop and I'm not super happy with how it turned out. It was a learning experience though! I learned that it's not so easy to cut striped paper on the diagonal freehand. And I learned that there is a real science (well, math!) to cutting diagonally and math is NOT my strong point anymore! And yes, I AM in accounting! But accounting and math are really quite different. So I am really on the fence as to whether to post it to that challenge or not.


But I AM super happy with how I used our Chopped elements! For this challenge, the mystery ingredients were the round tab punch and dazzling diamonds. I used the round tab punch in a creative way to come up with the brackets around my birthday greeting. And I used dazzling diamonds to mimic crystal cake stands on the stamped image.

And now that I have the photo all good and blown up, I can tell that I really need to get a new blade for my trimmer! No, I am definitely not using this for Sweet Sunday. Maybe I can get another card done this week instead.

Thank you so much for taking time to stop by and as always, if you have a question or comment I'd love to hear from you!

Stamps: Birthday Bakery, Occasional Quotes
Card stock: Whisper White, Concord Crush, Melon Mambo
DSP: Cheerful Treat
Punches: Round tab, Dotted Scallop Ribbon Border
Other: Dazzling Diamonds

Monday, October 3, 2011

Chopped challenge #3

Hi there! Today's card is once again combining two challenges. The first is for the Just Us Girls Sketch challenge 104 that you can find HERE. Happy 2nd Anniversary to the ladies at JUGS! I have been reading their blog for about 6 months but this is my first time actually posting my challenge card.

This is also for my Chopped Challenge #3. I actually posted out of order when I posted yesterday for our Chopped Challenge #4. Oops! Oh well. :) The items in our mystery basket were: the scalloped trim border punch, the elegant bouquet embossing folder, the large tag punch and pearls. In addition to the actual items, we were to make a vintage card. I think everything worked really well together for this challenge!


Thanks for stopping by and, as always, leave me a comment if you have any questions!

Stamps: Vintage Vogue, Fall Foliage
Cardstock: Rich Razzleberry, Old Olive, Very Vanilla
DSP: Newsprint (retired)
Ink: Rich Razzleberry, Old Olive, Soft Suede
Punches: Large Tag, Scallop Trim Border, Scallop Edge Border
Other: elegant bouquet embossing folder, Very Vanilla seam binding, Old Olive 5/8" satin ribbon, adhesive backed pearls

Sunday, October 2, 2011

Fall Thank-You

Happy Sunday!

I found a great new blog for challenges and so I thought I'd try it out this week. It is called Freshly Made Sketches and this week's challenge can be found HERE. I feel like this card is missing something but I can't quite put my finger on it. Any suggestions?


Thanks for stopping by!

Stamps: Day of Gratitude
Cardstock: Crumb Cake, Old Olive, Very Vanilla
DSP: Spice Cake
Ink: versamark, Bravo Burgundy, Early Espresso, Old Olive, More Mustard
Other: Two Tags die, scallop circle punch, thread, corduroy brad

Just a Note

Hi there! Gosh, I look at this blog and have to wonder if anyone even tries to come here anymore. It has been a long time since I posted! I've still been making cards but I just haven't taken the time to photograph them before I send them off. I think this will change though because I have been trying to keep up with at least a few challenges so I'll get better about posting. Here's hoping!

This card combines two challenges. First, it is part of Card Sketch Patterns #135. I loved this because I challenged myself to make a different size card than I normally do.

The card is also for my Chopped Challenge this week. My good friend and I love the show Chopped on Food Network. The contestants are given a basket of mystery ingredients and have to come up with a dish based on those ingredients. So my friend and I do a Chopped challenge of our own. In our "basket" this week, we had to use: a square punch, the spiral border punch, staples and crystal effects. In addition, the card had to contain the colors pink and black. How did I do?


Leave me a note if you have any questions!

All stamps Stampin' Up!

Thursday, January 27, 2011

Ooh, I should have waited to take a photo of this card until my lighting was better. But waiting on good lighting sometimes puts a crimp in my motivation so it didn't happen today. Today we'll all have to use our imaginations (and squinting just so) to see how it looks in real life. Actually, you don't have to squint at all to see that my stamping is crooked. Let that be my lesson to you today that you should always stamp your images first! Then if you mess up you can turn the paper over and do it again, or start fresh. Today, I stamped last and so everything else was already there and I decided that I didn't want to start completely over. But I'll take my own advice next time!


Thanks for stopping by!

Stamps: Party Hearty
Cardstock: Marina Mist, Chocolate Chip, Whisper White
DSP: Sweet Pea (retired)
Ink: Chocolate Chip, Marina Mist
Punches: scallop edge border, 3/4" circle
Other: Marina Mist grosgrain ribbon, silver brads, paper piercing tool, stitching

Wednesday, January 26, 2011

Mixing Sets

Do you have a hard time combining sets? I do! I think it has more to do with how I store my stamps than anything else but combining two sets to make a card almost never occurs to me. Today I forced myself to do it though and I think it turned out well!

Can you see the detail in the flowers? I was able to get that texture simply by placing my punched piece on the foam that comes in the paper piercing set and pressing down into the flower with the end of a pen cap. I think it adds a little something to the flower. Let me know if you have any questions. Thanks for stopping by!

Stamps: Season Of Friendship, Happy Moments (retired)
CS: Marina Mist, Whisper White, Rose Red, Pretty In Pink
Ink: Chocolate Chip, Marina Mist, Pear Pizazz
Punches: 1 3/4 x 7/8 oval, Flower Trio (retired)
Other: Pear Pizazz stitched poly ribbon, Basic Pearls


Tuesday, January 25, 2011

Valentine Pinwheel

A special thanks to Dawn Griffith for inspiring this card. I love this technique and hope to use it a lot in the future. It's perfect for using up small amounts of leftover designer series paper as I have done here.


The pinwheel is created by using two 2 5/8" square pieces of cardstock (in this case red) layered on top of one another but off set. You then punch out 8 squares using the 1 1/4" square punch, 4 each of two designs. Adhering only one corner of each piece, you place them in an overlapping fashion to the cardstock. When you reach the last one, you tuck it under and you're done! It looks much more complicated than it is. Let me know if you have any questions!

Stamps: Teeny Tiny Wishes
CS: Pretty in Pink, Real Red, Very Vanilla
DSP: Sending Love Specialty (retired)
Ink: Real Red
Punches: 1 1/4" square, Modern Label, Word Window, Trio Flower (retired)
Other: Pretty In Pink brad, Basic Pearls

Monday, January 24, 2011

Sending Love

The design for today's card was inspired by the card on page 18 of the new Occasions Mini Catalog. I love using our catalogs as jumping off points for my own designs.


I would have liked to use black ribbon on this card but the satin was too shiny and the grosgrain was too stiff. I really hope that we will get the seam binding ribbon in every color we carry! Wouldn't that be awesome?

Stamps: Love You Much
CS: Very Vanilla Textured, Cherry Cobbler, Basic Black, Very Vanilla
DSP: Patterns DSP Stack
Ink: Cherry Cobbler, Basic Black
Punches: Spiral Border, Heart To Heart
Other: Cherry Cobbler seam binding ribbon, black brad


Sunday, January 23, 2011

Special Thank You

Today's card is for a special mentor of mine. I hope she likes it! It was not a quick and easy card for sure but it was fun to make.


The flower was made by punching out a total of 5 scalloped circles and then folding 4 of them into fourths and then adhering those onto the fifth scallop. Before I folded them, I spritzed them with a combination of alcohol and champagne shimmer paint to give them a little shine and crumpled them up. I gave the leaves the same treatment. I like how it turned out. Let me know if you have any questions. Thanks for stopping by!

Stamps: Vintage Vogue, Thank You Kindly
CS: Chocolate Chip, Crumb Cake, Baja Breeze, Pear Pizazz, Very Vanilla
Ink: Chocolate Chip
Punches: 1 3/4"Scallop Circle, Scallop Trim Border, Decorative Label XL , Corner rounder (non-SU)
Die: Birds and Blooms
Other: Chocolate Chip Satin Ribbon, Self Adhesive Rhinestones, Sending Love brad (retired)