Saturday, October 16, 2010

Fang-tastic Halloween


Hi there!

Welcome to my first Mojo Monday attempt. Okay, it's not my first CARD I've made from the inspirational sketches, but it IS the first one I've managed to post.

I love the way this card turned out.

I started with a base of Old Olive card stock and then layered it with Whisper White that was sponged with old olive ink. A layer of the striped paper from Wicked Fun Specialty designer paper is attached to Rich Razzleberry at both the top and bottom with machine stitching. Don't you love how perfectly straight the scallop edge is? Want to know my secret? I punched out three flowers out of card stock using the Fancy Flower Extra large punch. Then I cut off two scallops at a time and laid them side by side. Cute, huh?

The cute little witch is stamped in black Staz-on onto Whisper White card stock and is colored in with markers. The sentiment is stamped on a piece of Old Olive card stock that has been punched out with the new Decorative Label punch that was then cut in half.

My "buttons" were created using a 1/2" circle punch, a 1/16" circle punch, versamark ink and embossing powder. I love these flatter "buttons" for mailing. The card is topped off with a piece of Rich Razzleberry polka dot grosgrain ribbon that has the polka dots turned to the inside.


I hope you enjoyed this card!

Stamps: Fang-tastic, Teeny Tiny Wishes
Card stock: Old Olive, Whisper White, Rich Razzleberry, Basic Black
DSP: Wicked Fun Specialty
Ink: Black Stazon, Pumpkin Pie, Old Olive, Rich Razzleberry, Versamark
Punches: Fancy Flower, Designer Label, 1/2" circle
Other: Rich Razzleberry polka dot grosgrain ribbon (retired), clear embossing powder


Sunday, August 22, 2010

Amour Box

Hi friends!

Today I made a box to share with you. My pictures don't do it justice of course. I really need to improve my photography skills!

Anyway, this was a really fun project to put together. The box is made from a 6"x6" piece of black cardstock and a 6"x6" piece of designer series paper. Both sheets are scored at 1" on all sides, tabs cut on two sides and adhered to make the box shape.

I decorated the top of the box with the Artistic Etchings stamp set and some of the yummy new Cherry Cobbler seam binding that is available September 1st from the new Holiday Mini. Have you received your copy yet? If not and you would like one, leave me a comment and I'll be happy to contact you to get yours to you.

Before adhering all the pieces to the top, the box received a light spritz of champagne shimmer mist. It is so pretty in person.


I overworked my score lines on the designer series paper and one of the corners tore a little bit when I was putting the top on. So I reinforced all four corners with the word window punch. It looks a bit like the bits of strapping on an old-fashioned suitcase and I love it!

Stamps: Artistic Etchings
Cardstock: Basic Black, Very Vanilla
DSP: Newsprint
Ink: Black Stazon, Cherry Cobbler
Punches: Word Window
Other: Antique Brads, Cherry Cobbler seam binding, Champagne shimmer paint


Thursday, August 19, 2010

New or old? Does it matter?

Hi friends!

Recently there was a discussion on one of my favorite stamping message boards about using up your stash of retired paper that really got me thinking. I LOVE buying and using new paper (and stamps, and accessories, and punches, etc.) as much as the next stamper! But what sometimes happens, at least with me, is that we buy so much new stuff and our "old" stuff gets shoved to the back of the closet or underneath all the new stuff. I have unearthed what was "new stuff" not long ago which is now retired and I never even opened the package! Please tell me this happens to other people too! I'm not alone in this, right?

I have decided that I really need to use what I love and that means that sometimes I will be using retired product. Most of the cards and projects I make can be adapted to any paper or any embellishments anyway. And while I would LOVE to sell new products to you, I also want to encourage you to use what you have. Use it in a different way than you ever thought you would. Try some color combinations that you think don't "go". Use some stamp sets that are in the back of your closet and pair them with some of your newer sets. Have some fun! Plus, remember that you can get a great deal on some retired items by checking out the Clearance Rack in my online store (link to my store is on the right sidebar). Of course if you must buy some new things too I'll never tell!

Today I put my money where my mouth is and I present my own version of a "hybrid" card. Only instead of mine being a hybrid of traditional and digital cardmaking, they are hybrids of new and old product.

Both cards are very similar and were inspired by a great card artist, Vicki Burdick.

Stamps: Apple Blossoms (level 2 hostess set), Teeny Tiny Wishes
Cardstock: Crumb Cake, Cajun Craze, Very Vanilla
DSP: Fall Flowers (ret.)
Ink: Crumb Cake, Cajun Craze, Early Espresso
Punches: Large corner rounder (ret), Spiral Punch
Other: Orchard ribbon (ret), vintage brads (ret), library card template from Heather Nichols


Stamps: Apple Blossoms (level 2 hostess set), Teeny Tiny Wishes
Cardstock: Crumb Cake, Brilliant Blue (ret), Real Red, Very Vanilla
DSP: Summer Picnic (ret.)
Ink: Crumb Cake, Real Red, Early Espresso
Punches: Large corner rounder (ret), Spiral Punch
Other: Striped grograin ribbon (ret), playground buttons (ret), scallop envelope die (for pocket), library card template from Heather Nichols

Do you use mostly new products? Mostly old? Does it matter to you?

So, what do you say? Let's be trendsetters and show how the latest and greatest can be combined with last year's latest and greatest to create some fabulous projects!

Monday, July 5, 2010

Happy Birthday, Baby!

Hi there! No, I haven't forgotten about my blog OR stamping! It seems like time is just going by way too quickly. I picked my daughter up from college in the middle of May and then we were on vacation. Since then I have been creating cards and sending them out in order to meet deadlines and keep forgetting to photograph my projects first.

Today I remembered and took a minute to take a picture before heading out to my great-niece's first birthday party!


This was a fun card to make since I just LOVE the Fox and Friends stamp set. I am so glad it was included in the new 2010-2011 Idea Book and Catalog!

The card base is Crumb Cake with a layer of Chocolate Chip on top of that. The squares are Melon Mambo and the images are stamped onto Whisper White with Pumpkin Pie and Chocolate Chip. I am making myself hungry typing this list!

The ribbon I used is no longer available (sob!) but there are several ribbons in the new catalog that could be substituted.

By the way, if you would like a copy of the catalog let me know. They are $5 plus shipping if you buy from me directly. If you are local to me, I am happy to deliver it to you to save you the shipping fee.

Thanks for stopping by!

Stamps: Fox and Friends, Teeny Tiny Wishes, Tiny Tags
Cardstock: Crumb Cake, Chocolate Chip, Melon Mambo, Whisper White
Ink: Chocolate Chip, Pumpkin Pie, Melon Mambo
Punches: 1 3/8" square, 1 1/4" square, Modern label, Word Window, Medium Jewelry Tag
Other: Melon Mambo polka dot ribbon (retired), dimensionals, linen thread

Friday, April 2, 2010

Gift Card Holder

Happy Friday! GOOD Friday that is!

Today I want to show you another gift that will be in my daughter's Easter basket on Sunday morning. I love having an older "child" because she will appreciate this gift even if it's not toys or candy! It's holding a gift card to a college girl's heaven.... Starbucks!

It is made from a sheet of card stock cut to 4 1/4" x 11" and scored at 4 1/4" and 8 3/4". After I folded it, I embossed the flap using the Petals a Plenty embossing folder and the Big Shot. I sponged over the top of the embossed area with ink to really make the flowers stand out. I took another piece of card stock and stamped the little bird and then colored it in. I punched a slot for the gift card using the Word Window punch.


Since there is no slot or other way of keeping the holder closed, I made a band out of coordinating designer series paper that slides down over the top and then made a flower using designer series paper and the scallop circle punch.


My lighting was not the best when I was taking these photos and the card looks way more awesome in person.

Thank you for stopping by and, in case this weekend gets away from me, Happy Easter to you all!

All supplies Stampin' Up!
Stamps: Fun & Fast Notes, Teeny Tiny Wishes
Card stock: Orchid Opulence, Whisper White
DSP: So Saffron DSP, Sweet Pea
Ink: Orchid Opulence, black Stazon, Watercolor Wonder Crayons (Bold Brights)
Punches: Scallop circle, word window
Other: blender pens, soft subtles brad, Petals A Plenty embossing folder, Big Shot

Tuesday, March 30, 2010

Easter Boxes


These are two boxes I made that will be appearing in my daughter and her friend's Easter baskets next week! I have no idea what will be in them, but most likely either Hershey's nuggets or mini jelly beans.

Each box was made using the Matchbox die, cardstock and Sweet Pea Designer Paper. Such an easy way to get a functional item that looks really cute! I hope they like them and I hope you do too!

Stamps: Teeny Tiny Wishes
Card stock: Pretty in Pink, Bashful Blue
DSP: Sweet Pea Designer paper (OM)
Ink: Chocolate Chip, Bashful Blue
Other: Chocolate Chip satin ribbon (OM), 1/4" white grograin ribbon, Sweet Pea Stitched Felt (OM), dimensionals

Let me know if you have any questions. Thanks for stopping by!

Monday, March 29, 2010

Paper Flower bookmark


I have been seeing these paper flowers everywhere and decided to try some for myself. They are so much fun to make!

First, I punched out six scalloped circles with my punch from Very Vanilla card stock. I then folded, crushed, unfolded, folded again until I got a lot of good texture on each one. You can also spritz these lightly with water to make the folding easier but I didn't in this case. Once all the pieces have been wadded up, carefully unfold each one and lay them on top of each other.

Using my paper piercer, I made a hole through all six layers and inserted a silver brad through the hole and fastened it. Starting with the top layer, I brought up each layer into the center, crimping and folding to make it as tight as possible, repeating with all the layers. After I got all the layers pulled up into the center, I started gently separating the layers back out.

I used two markers, Ruby Red and Cameo Coral and just made random marks into the various layers of the flower. Then I spritzed the whole thing with the shimmer mist I made using rubbing alcohol and Champagne Mist shimmer paint. It is hard to see in the photo but doing that made the marker run a bit, blending the colors together and also making the flower fairly stiff to hold it's shape. It also gave a really nice, subtle shimmer to the flower. Two leaves were cut from Old Olive card stock using the Birds & Blooms die cut.

The bookmark was cut from Ruby Red cardstock using the Two Tags die and my Big Shot. I then stamped the sentiment on the edge using Black Stazon ink, and stamped a flower using Versamark ink for a watermark look.

The flower is attached to the bookmark using pop up glue dots.


Stamps: Vintage Vogue
Cardstock: Ruby Red, Very Vanilla, Old Olive
Ink: Ruby Red, Cameo Coral markers
Punches: Scalloped Circle
Die cuts: Birds & Blooms, Two Tags
Other: Silver brad, pop up glue dots, Champagne Mist shimmer paint

Let me know if you have any questions. Thanks for stopping by!

Sunday, March 28, 2010

Sweet Pea Birthday for the guys


Today's card is another one using Sweet Pea Designer Paper. I love this paper and will be sorry to see it go at the end of April. Can you believe that's next month? Time is just flying by.

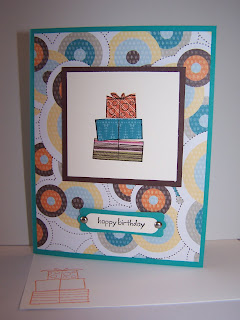
ANYWAY, this card has very little stamping on it. I stamped the presents using the Sale-A-Bration set Happy Moments (only available until March 31!) on three scraps of different papers from the Sweet Pea stack. I then cut out a box from each paper and re-assembled them on a piece of vanilla card stock. This is an easy way to get some very detailed "coloring" in your images. It is a technique that works well with line drawings. Give it a try!

I have noticed in looking back through some of my posts that I use the modern label and word window punches a LOT in my greeting cards. I guess if something's not broke, don't fix it! I love the way these two punches coordinate and make it really easy to make a simple greeting stand out.

Stamps: Happy Moments (SAB)
Cardstock: Bermuda Bay, Chocolate Chip, Very Vanilla
DSP: Sweet Pea Designer Paper stack (OM)
Ink: Basic Black
Punches: Modern Label, Word Window
Other: Silver brads, dimensionals
All supplies Stampin' Up!

Let me know if you have any questions. Thanks for stopping by!

Sunday, March 21, 2010

Sale-A-Bration coming to an end

It has been a busy couple of weeks in my house. My daughter was home for spring break and not many cards or other projects got made, much less photographed! But I am heading to my studio this morning before I leave to drive her back to school so I will have some projects posted this week.

Just a reminder that Stampin Up!'s Sale-A-Bration is nearing the end for 2010. This great event comes only once a year so if you have items on your wish list now is the time to buy them. Only during Sale-A-Bration do you get rewarded with FREE stamps, paper and punches for every $50 you spend. Do you have a larger wish list than $50? Me too! The good news is that if you buy $100 worth of product you get 2 free items! Have $300 to spend? Get hostess benefits! You get a free hostess set, $35 in free product and get SEVEN Sale-A-Bration items. All for free! Of course you also get hostess benefits anytime your order equals $150 or more. And you didn't have to do any work. I love this company!

Sale-A-Bration ends March 31st so if you do wish to order something please click through to My Website prior to March 31st. If you prefer me to order for you, leave a comment with your email address no later than March 30th and I'll contact you.

Thanks for stopping by!

Tuesday, March 2, 2010

Mod Birthday

Good morning! Today's card is another easily adaptable card. What that means to you is that you can make this card to fit any occasion simply by changing one or two elements to fit your needs. Need a get well card instead of a birthday card? No problem! Just switch the stamp set from Party Hearty to Wellness Wishes (115356). Or if you need a wedding card, try Ever After (113401). You are only restricted by your imagination! So liberating! If you try this card another way, send me a picture or direct me to your blog. I'd love to take a peek!


Stamps: Party Hearty (111532), Seeing Spots (retired- on envelope only)
Cardstock: Kraft, Chocolate Chip, Whisper White, Sweet Pea DSP(117161) Occasions Mini
Ink: Taken With Teal, Chocolate Chip
Punches: 1/2" circle (104390)
Other: Chocolate Chip 5/8" Satin Ribbon (117287) Occasions Mini (sidenote: this ribbon is AWESOME and I really hope it is continued into the new big catalog! I can't say enough nice things about it!)

Monday, March 1, 2010

Sweet Pea Birthday

Good morning!

Today's card is impossibly easy and quick to put together. Did you notice that there is only one stamp used on the whole thing?

For this card I simply adhered a piece of Designers Series Paper to the bottom part of my card, crumpled a narrow strip of cardstock for the flower stem, attached the felt pieces with glue dots, and stamped and punched out the simple birthday greeting. To make it even more special, I also decorated the flap of the envelope with the same paper. Quick and easy but oh-so-cute!

This could be switched up by making flowers our of some of the punches and actually stamping some flowers on the bottom of the card. Give it a try and see what you come up with!


Stamps: Happy Moments (118664 wood, 119125 clear mount) SAB catalog
Cardstock: Sahara Sand, Rose Red, Old Olive, Sweet Pea DSP ( 117161) Occasions Mini
Ink: Chocolate Chip
Punches: Word Window ( 105090), Modern Label (116630)
Other: Sweet Pea Stitched Felt (117266) Occasions Mini

Let me know if you have any questions! Thanks for stopping by.

Sunday, February 28, 2010

Butterfly Birthday

Good morning!

Today's card was inspired by a card that I received in a swap. It is a birthday card for my Aunt Terri and I hope she liked it!

I am loving the Sweet Pea Designers Series paper! The colors are ones that I would never think to put together (well some of them are - I mean Chocolate Chip and Pretty in Pink? Fav combo ever) but they really work well together.

If you click on the photo to make it larger, you will see that I put Crystal Effects on the butterfly that is in the center of the scalloped element. It was a good way to add some dimension and shine to the card. In hindsight, I really wish I would have done the same thing to the butterfly that is on the flat part of the card. I think that would have been a nice touch. Next time!

Remember how I don't like naked envelopes? For this one I simply adhered the same patterned paper on the outside flap of the envelope with snail and trimmed the excess off. Easy!

Stamps: Vintage Vogue ( 117690 (wood), 118598 (clear mount)), Teeny Tiny Wishes (115370)
Cardstock: Whisper White, Pretty in Pink, Chocolate Chip, Sweet Pea Designer Series Paper (117161)
Ink: Pretty in Pink, Close to Cocoa
Punches: Scallop Circle (109043), 1 1/4" circle (104403), Word Window (105090), Modern Label (116630), Scallop Trim border (118402)
Other: Crystal Effects (101055), Dimensionals (104430)

Let me know if you have any questions on how this went together or if you want to order any products. Several of the products used on this card are out of the Occasions mini catalog that is only good until April 30, 2010 and I don't know if any of them are going to make it in to the new "big" catalog. If you see something you love, don't take a chance on missing out!

Thanks for stopping by!


Thursday, February 11, 2010

Monkeys!

Omigosh! I am SO in love with the monkey from the Fox and Friends stamp set! I just think he is the cutest little thing with his crooked smile and curly tail! Here is a bookmark that I made as one of my swaps for regionals. It looks really crooked but I think that is more due to my photography skills than my stamping skills! Although that's not to say nothing is ever crooked. "I meant it to be that way" is a valid saying!


Stamps: Fox & Friends (Occasions Mini), Whimsical Words (Sale-a-bration), Cheep Talk
Card stock: Whisper White, Real Red
Ink: Chocolate Chip, Old Olive
Punch: Small heart (Occasions mini), slot punch
Other: polka dot embossing folder (Occasions mini), Dazzling Diamonds glitter, Chocolate Chip satin ribbon (mini), linen thread

Let me know if you have any questions and thanks for stopping by!

Sunday, February 7, 2010

Friend Swap Card

Hi there! This is another swap I made for regionals (which, BTW, was AWESOME and you should go if you are a demo and ever get the chance). I really liked how this card turned out. It was a reminder to me also that "Valentine's" stuff doesn't have to only be used for Valentine's day!


Stamp set: With All My Heart
Cardstock: Whisper White, Pretty in Pink
Specialty Designer Series Paper: Sending Love Specialty
Ink: Rose Red, Creamy Caramel
Embellishments: Pretty in Pink Satin Ribbon, brad
Punches: Trio Flower, Scallop Edge

Let me know if you have any questions! Thanks for joining me.

Friday, February 5, 2010

You're Too Kind

Today I am attending a half day regional Stampin Up seminar and I am so excited! One of the things that demos do when we all get together is to swap cards or other items.

This project is one of the card fronts I made to swap and was inspired by my upline, Angie:


Stamps: Fox and Friends, Whimsical Words, Love You Much
Cardstock: Rose Red, Chocolate Chip, Old Olive
Ink: Chocolate Chip
Designer Series Paper: Sweet Pea
Embellishments: Stampin Dimensionals, Polka Dot embossing folder'
Punches: 1 1/4" circle, 1 3/8" circle, scallop circle, 3/16" corner rounder


Let me know if you want specific dimensions or if you have any questions! Thanks for joining me!


Masculine Birthday Card

Thanks for joining me on the maiden voyage of this blog!

Today I would like to show you a masculine birthday card. Really the only thing making it masculine is the color scheme. This card could easily be changed up to a kid-friendly card or a more feminine card just by switching up the papers! I love versatility.


Stamp sets: Party Hearty, Teeny Tiny Wishes
Card base: Very Vanilla cardstock
Layers: Only Orange cardstock, Not Quite Navy, Sweet Pea Designer Series Paper, Very Vanilla
Embellishments: Pumpkin Pie brads, linen thread, dimensionals
Punches: Word Window, Modern Label
All supplies Stampin Up!